Building a Flask Web Application (Flask Part 2)
(Note: This post is part of my reddit-scraper series)
Summary
- Web frameworks intro
- Explore the Flask microframework
- Understand the Model-View-Controller (MVC) pattern
- Build Flask web app
Last time we started our web application adventure by learning how to generate dynamic HTML webpages from data stored in MongoDB using MongoEngine and Jinja2. In this post, we will leverage the Flask microframework to serve the webpages we render to our users.
Specifically we will explore the Flask library, learn about the Model-View-Controller (MVC) design pattern, and discuss how Flask fits into MVC by building our first Flask web application to display scraped data stored in MongoDB.
What You Need to Follow Along
Development Tools (Stack)
Code
- Github Repo - Tag: blog-flask-part2
We can checkout the code from the git repository as follows:
$ git checkout tags/blog-flask-part2
Note: checking out 'tags/blog-flask-part2'.
Or we can use GitZip to download the tagged commit by URL.
Introduction to Web Frameworks
What is a web framework? When should we use one?
A web framework is a library that allows us to "write web applications or services without having to handle low-level details such as protocols, sockets or process/thread management". The majority of Python web frameworks are "exclusively server-side technologies" (i.e. render pages on the server before sending to users), but they are increasingly supporting client-side technologies (like Ajax -- think Google Maps) to provide users with rich, interactive experiences in the browser (Source).
Some common tasks that web frameworks can handle include:
- URL routing
- HTML, XML, JSON, and other output format templating
- Database manipulation
- Security against Cross-site request forgery (CSRF) and other attacks
- Session storage and retrieval
There are no shortage of Python web frameworks for us to use; their functionality falls on the spectrum of "executing a single use case to providing every known feature" to developers (the batteries included approach) (Source). O'Reilly released a short, but detailed, e-book that examines the entire Python web framework ecosystem and provides detailed analysis of the 6 most widely used libraries: Django, Flask, Tornado, Bottle, Pyramid, and CherryPy.
For our use case, we will be creating and deploying a Flask web application.
Additional Resources
- Choosing Python Web Frameworks: Django and Flask - Coding Dojo
- Pirates use Flask, the Navy uses Django - WakaTime Blog
- Flask or Django for a beginner? - StackOverflow (Praise Be)
- Synopsis: Start with Flask, switch to Django if we need to scale
- Django vs. Flask: Picking the Right Python Web Framework - Tivix
Flask
In the previous post, we briefly mentioned that Flask is the best Python web framework for our use case. What does this mean? In this section, we will introduce Flask and discuss the features that make it so popular.
As the name implies, the Flask microframework is a lightweight web framework that we can extend to get the functionality we require.
From the documentation:
Flask aims to keep the core simple but extensible. Flask won’t make many decisions for you, such as what database to use. Those decisions that it does make, such as what templating engine to use, are easy to change. Everything else is up to you, so that Flask can be everything you need and nothing you don’t.
Taking a build-your-own framework approach to web development allows us to get projects off the ground quickly; we only use the extensions we require for our specific use case. With just a few lines of code, we can create a website with:
- URL routing
- template rendering
- two-way client communication
- redirects and error handling
- logging
The Flask documentation has great advice on how to grow and become big with Flask. We can also leverage the list of common design patterns to ensure we are following best practices as outline by the project contributors.
Notes
- Check out the Flask Extension Registry to see a list of ready-made features we can hook into our web app.
- Extensions such as Flask-Diamond can turn Flask into a batteries-included web framework. This extension provides scaffolding for features such as: account management, administrative access, databases, email, testing, documentation, deployment, and more. This library was featured in Episode 98 of the Talk Python to Me podcast. I will be using Flask-Diamond for a work project in the next couple of months and will blog about my experience once the application is in production.
- Cookiecutter Flask is batteries-included library based on the Bootstrap template.
- Explore Flask is an online resource detailing best practices and patterns for developing web applications with Flask.
Model-View-Controller
Model–View–Controller (MVC) is an architectural pattern for implementing user interfaces. It divides an application into three interconnected parts: the Model, the View, and the Controller. Separating the "internal representations of information from the ways that information is presented to and accepted from the user" allows us to increase modularity for simultaneous development and code reuse (Source).
Each of the components is defined as follows:

Interactions Betweeen Components
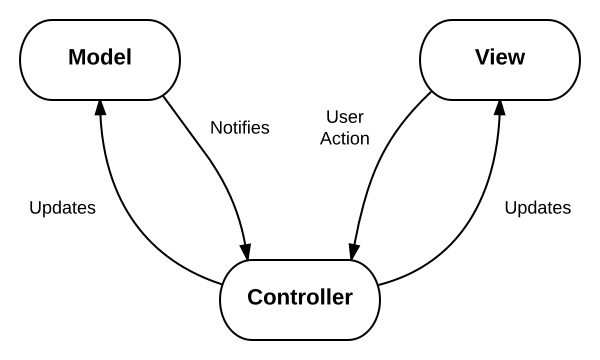
The MVC design pattern also defines interactions between components, as we can see in the following diagram from Wikipedia:

- The model stores data that is retrieved according to commands from the controller
- The view generates output for the user based on changes in the model
- The controller acts on both model and view; it sends commands to the model to update its state and to the view to change information presented to users
In the next section, we will examine how Flask fits into the MVC framework by building our first web application.
Additional Resources
- Model–view–controller - Wikipedia
- What is MVC, really? - StackOverflow (Praise Be)
- Model-View-Controller (MVC) Explained -- With Legos - Real Python
- Model View Controller Explained - Tom Dalling
- Design Patterns - MVC Pattern - Tutorials Point
Building Reddit Top Post Web App
Using the Flask Quickstart and Tutorial as reference, let's open up our favorite text editor and start coding!
Model
In the previous post, we utilized the MongoEngine ORM library to pull data out of MongoDB. We modify our code to get the following:
# models.py

from flask_mongoengine import MongoEngine

db = MongoEngine()


class Post(db.Document):
    ''' Class for defining structure of reddit-top-posts collection
    '''
    url = db.URLField(required=True)
    date = db.DateTimeField(required=True)
    date_str = db.StringField(max_length=10, required=True)
    commentsUrl = db.URLField(required=True)
    sub = db.StringField(max_length=20, required=True) # subredit can be 20 chars
    title = db.StringField(max_length=300, required=True) # title can be 300 chars
    score = db.IntField(required=True)

    meta = {
        'collection': 'top_reddit_posts', # collection name
        'ordering': ['-score'], # default ordering
        'auto_create_index': False, # MongoEngine will not create index
        }
Note
- We are using the Flask-MongoEngine library instead of the MongoEngine library. This Flask specific library adds support for forms (via WTForms), error handling (i.e. 404 support), results pagination, and the use of MongoDB as a session store.
Controller
The code for the controller can be split into three sections: initialization, routing, and execution.
Initialization
After creating a Flask instance, we set our configuration options and connect our database to the current instance.
Since Flask is instance based, we create an instance and configure the settings for that instance. This allows us to have multiple processes, each with a different configuration.
# app.py (1/3)

from flask import Flask, render_template
from models import db, Post

# initialize instance of WSGI application
# act as a central registry for the view functions, URL rules, template configs
app = Flask(__name__)

## include db name in URI; _HOST entry overwrites all others
app.config['MONGODB_HOST'] = 'mongodb://localhost:27017/sivji-sandbox'
app.debug = True

# initalize app with database
db.init_app(app)
Notes
- The Flask API docs provide information on the first parameter we pass into the
flask.Flask()function (i.e.__name__). - We will be leveraging Flask's Debug Mode to help us find bugs in our code as we are developing.
Routing
Flask requires us to define URL routes for our web application so it knows which pages to display/render when users access specific URLs.
Each route is associated with a controller – more specifically, a certain function within a controller, known as a controller action. So when you enter a URL, the application attempts to find a matching route, and, if it’s successful, it calls that route’s associated controller action.
Within the controller action, two main things typically occur: the models are used to retrieve all of the necessary data from a database; and that data is passed to a view, which renders the requested page. The data retrieved via the models is generally added to a data structure (like a list or dictionary), and that structure is what’s sent to the view.
We use decorators to define URL routes in our application instance. What's a decorator? Great question! Check out this primer on function decorators in Python.
# app.py (2/3)

@app.route("/")
def index():
    ## get the last date the webscraper was run
    for post in Post.objects().fields(date_str=1).order_by('-date_str').limit(1):
        day_to_pull = post.date_str

    return render_template(
        'index.html',
        Post=Post,
        day_to_pull=day_to_pull
        )

@app.route("/date")
def all_dates():
    ## get all the dates the scraper was run on
    dates = Post.objects().fields(date_str=1).distinct('date_str')

    return render_template(
        'all-dates.html',
        dates=reversed(list(dates)) # latest date on top
        )

@app.route("/date/<day_to_pull>")
def by_date(day_to_pull=None):
    return render_template(
        'index.html',
        Post=Post,
        day_to_pull=day_to_pull
        )

@app.route("/sub")
def all_subs():
    ## get all the dates the scraper was run on
    subs = Post.objects().fields(sub=1).distinct('sub')

    return render_template(
        'all-subreddits.html',
        subs=sorted(list(subs), key=str.lower) # sort list of subreddits
        )

@app.route("/sub/<sub_to_pull>")
def by_subreddit(sub_to_pull=None):
    return render_template(
        'by-subreddit.html',
        Post=Post,
        sub=sub_to_pull
        )
Notes
- URL routes can include variables in their definitions allowing us to customize our queries to get the exact information requested.
- We use MongoEngine to query our database to get the recordset defined by our various routes.
- Flask supports all HTTP request methods.
- Controllers pass data into view templates and then render HTML using Jinja2. We will cover this topic in the
Viewsection.
Execution
To run our Flask application, we can add the following code to our app.py module to ensure it executes when it's run as a script.
# app.py (3/3)

if __name__ == "__main__":
    app.run()
View
As we mentioned before, the view is the user interface (UI) of our web application which renders data from the model as defined by our template. If this sounds familiar, it's because it is. We have already used the Jinja2 Templating Engine to generate HTML webpages. In this section, we will build upon our previous work and leverage the concept of Jinja template inheritance to create complex applications using an inheritance hierarchy.
Let's start off by acknowledging that as programmers, we aren't designers, but this shouldn't limit our ability to produce web app with attractive UIs. Like everything else in development, we can stand on the shoulders of giants and use templates created by those who came before us. The HTML5 Boilerplate is a popular front-end template we can use to kickstart our project.
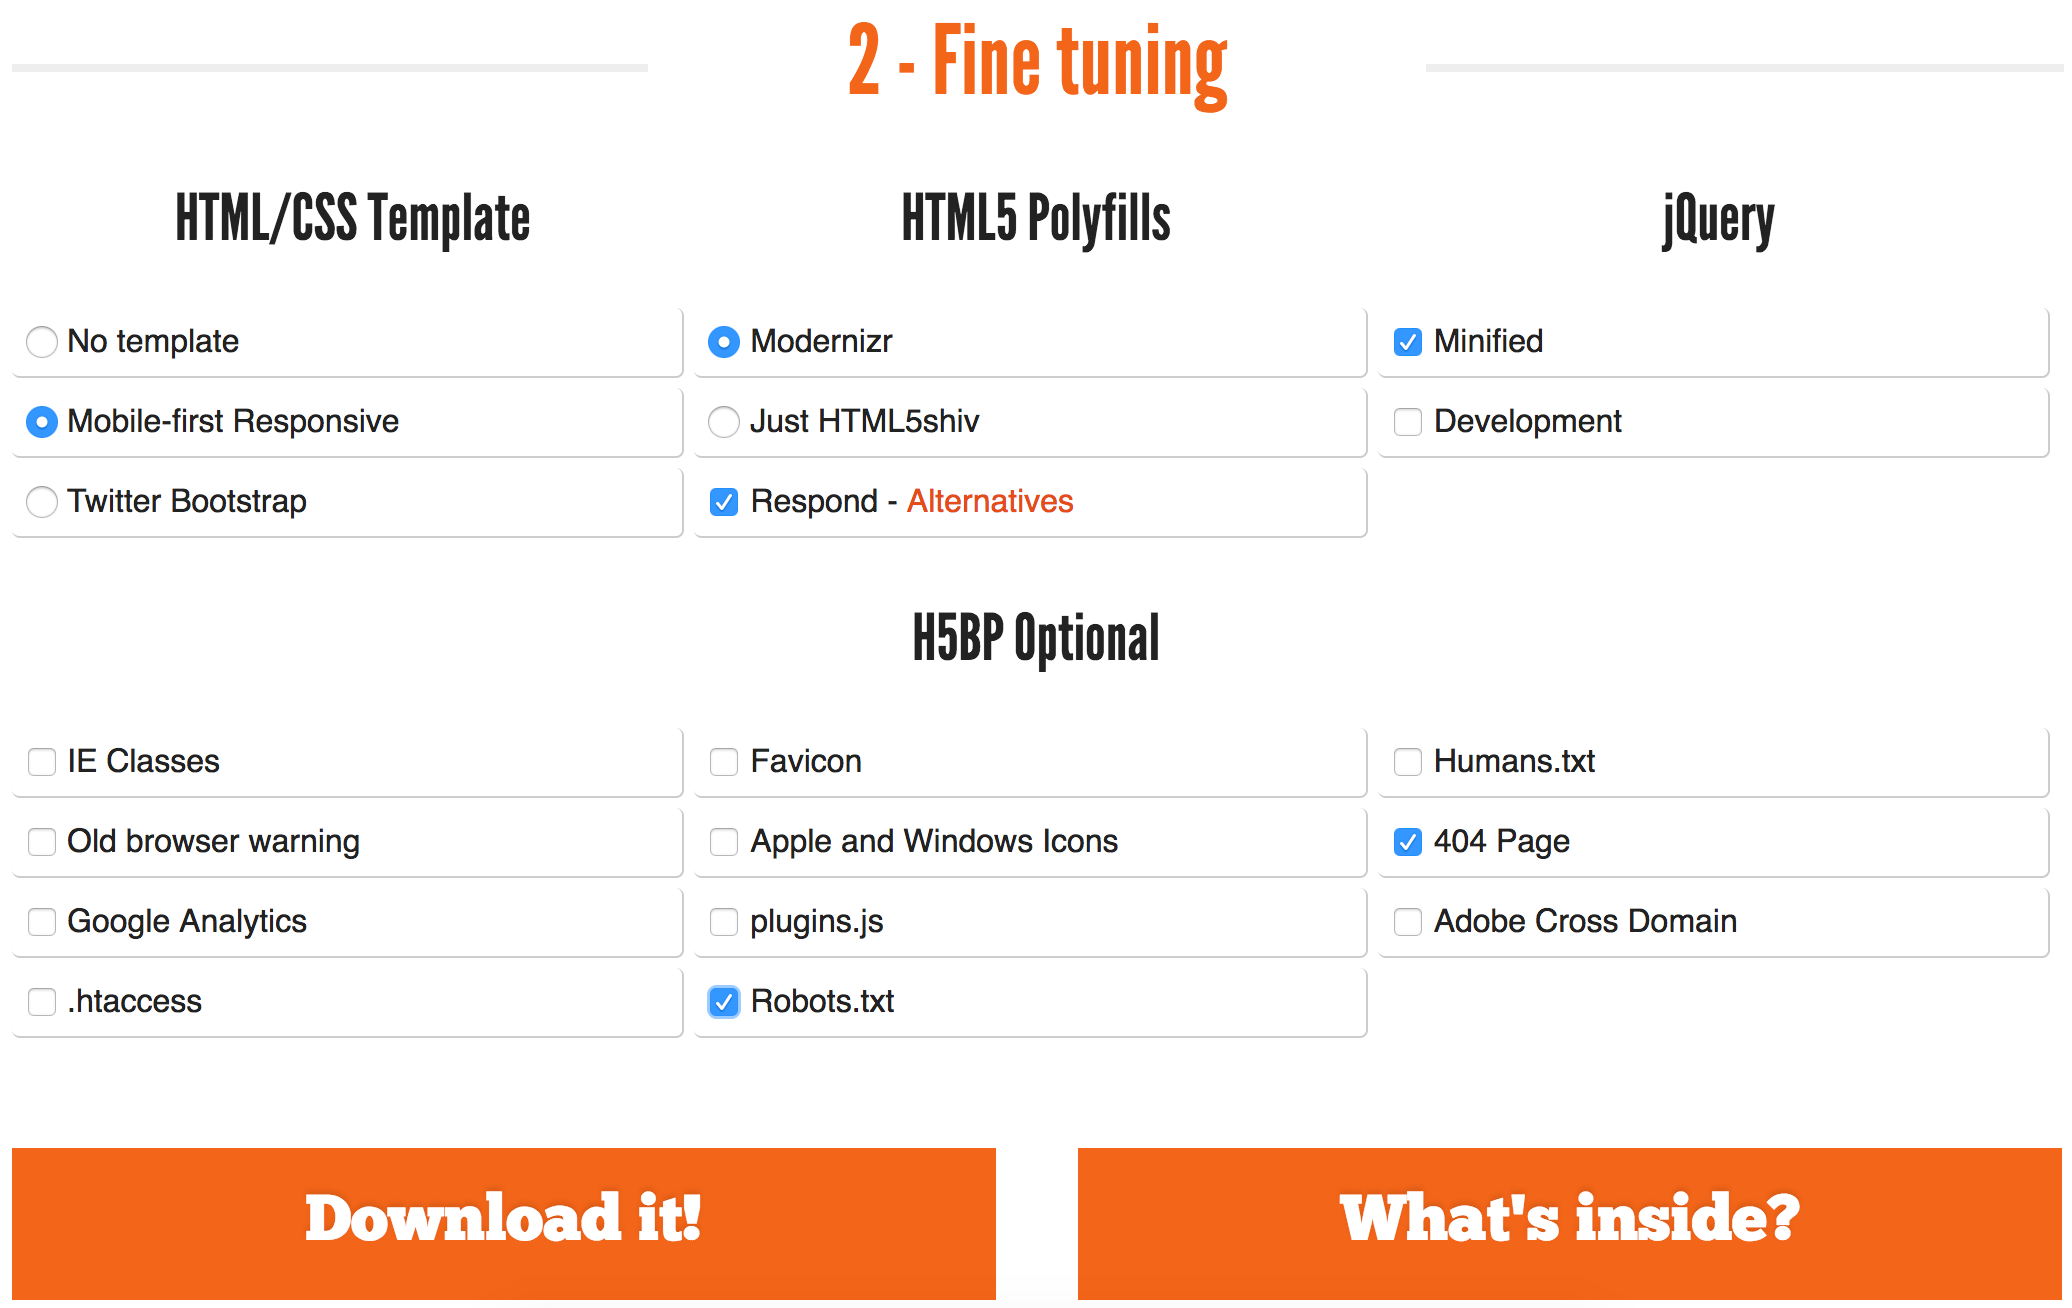
Using this post on how to use the HTML5 Boilerplate as a reference, let's get our hands dirty and create templates for our Reddit Top Posts website. Download and extract a copy of the Responsive Template (docs) from initializr.com:

Since Flask looks for Jinja2 files in the templates folder and javascript/css files in the static folder, we will structure our application folder as follows:
.
├── app.py
├── models.py
├── static
│   ├── css
│   │   ├── main.css
│   │   ├── normalize.css
│   │   └── normalize.min.css
│   └── js
│       ├── main.js
│       └── vendor
│           ├── jquery-1.11.2.min.js
│           └── modernizr-2.8.3-respond-1.4.2.min.js
├── status
└── templates
    ├── 404.html
    ├── all-dates.html
    ├── all-subreddits.html
    ├── base.html
    ├── by-subreddit.html
    └── index.html
Base Template
Using the concepts of Jinja2 template inheritence to create our hierarchy of views, we create our base template as follows:
<!--templates/base.html-->
<!doctype html>
<html class="no-js" lang="">
<head>
<meta charset="utf-8">
<meta http-equiv="X-UA-Compatible" content="IE=edge,chrome=1">
<title>Reddit Top Posts - {% block title %} {% endblock %}</title>
<meta name="description" content="">
<meta name="viewport" content="width=device-width, initial-scale=1">
<link rel="stylesheet" href="../static/css/normalize.min.css">
<link rel="stylesheet" href="../static/css/main.css">
<script src="../static/js/vendor/modernizr-2.8.3-respond-1.4.2.min.js"></script>
</head>
<body>
<div class="header-container">
<header class="wrapper clearfix">
<h1 class="title">Reddit Top Posts</h1>
<nav>
<ul>
<li><a href="{{ url_for('index') }}">Home</a></li>
<li><a href="#">Log In</a></li>
<li><a href="#">Sign Up</a></li>
</ul>
</nav>
</header>
</div>
<div class="main-container">
<div class="main wrapper clearfix">
<article>
{% block content %}
{% endblock %}
</article>
<aside>
{% block aside %}
<h3><a href="{{ url_for('all_dates') }}">Select by Date</a></h3>
<h3><a href="{{ url_for('all_subs') }}">Select by Subreddit</a></h3>
{% endblock %}
</aside>
</div> <!-- #main -->
</div> <!-- #main-container -->
<div class="footer-container">
<footer class="wrapper">
<h5>© Copyright 2017 by <a href="http://alysivji.github.io">Aly Sivji</a></h5>
</footer>
</div>
<script src="//ajax.googleapis.com/ajax/libs/jquery/1.11.2/jquery.min.js"></script>
<script>window.jQuery || document.write('<script src="../static/js/vendor/jquery-1.11.2.min.js"><\/script>')</script>
<script src="../static/js/main.js"></script>
</body>
</html>
Notes
- Child templates can replace the default content of items in between
{% block %}and{% endblock %}tags. - The
url_for()method can generate URL endpoints - We changed the paths to the files in the
staticfolder to match our new web application directory structure.
Child Templates
Each of our child templates will display a different view of our data. We will design our views as follows:

<!--templates/index.html-->

{% extends "base.html" %}

{% block title %}Index{% endblock %}

{% block content %}
    <h3>Last Run: {{ day_to_pull }}</h3>

    <ul id="posts">
        {% for selected_sub in Post.objects(date_str__gte=day_to_pull).distinct('sub') %}
            <h3>{{ selected_sub }}</h3>

            {% for post in Post.objects(date_str__gte=day_to_pull, sub=selected_sub) %}
                <li><a href="{{ post.url }}">{{ post.title }}</a> (Score: {{ post.score }} | <a href=" {{ post.commentsUrl }}">Comments</a>)</li>
            {% endfor %}

        {% endfor %}
    </ul>
{% endblock %}
<!--templates/by_subreddits.html-->

{% extends "base.html" %}

{% block title %}Index{% endblock %}

{% block content %}
    <h3>Selected Sub-Reddit: {{ sub }}</h3>

    {% for date in Post.objects(sub=sub).fields(date_str=1).distinct('date_str') %}
        <h3>{{ date }}</h3>

        <ul id="posts">
            {% for post in Post.objects(date_str=date, sub=sub).order_by('-date_str') %}
                <li><a href="{{ post.url }}">{{ post.title }}</a> (Score: {{ post.score }} | <a href=" {{ post.commentsUrl }}">Comments</a>)</li>
            {% endfor %}
        </ul>

    {% endfor %}
{% endblock %}
<!--templates/all-dates.html-->

{% extends "base.html" %}

{% block title %}By Date{% endblock %}

{% block content %}
    <h3>Available Dates</h3>

        {% for date in dates %}
            <p><a href="{{ url_for('by_date', day_to_pull=date) }}">{{ date }}</a></p>
        {% endfor %}

{% endblock %}
<!--templates/all-subreddits.html-->

{% extends "base.html" %}

{% block title %}By Sub-Reddit{% endblock %}

{% block content %}
    <h3>Available Sub-Reddits</h3>

        {% for sub in subs %}
            <p><a href="{{ url_for('by_subreddit', sub_to_pull=sub) }}">{{ sub }}</a></p>
        {% endfor %}

{% endblock %}
That's it. We can now run our web app.
Running Flask Application
Let's run the app:
$ python app.py
* Running on http://127.0.0.1:5000/ (Press CTRL+C to quit)
* Restarting with stat
* Debugger is active!
* Debugger pin code: 302-658-435
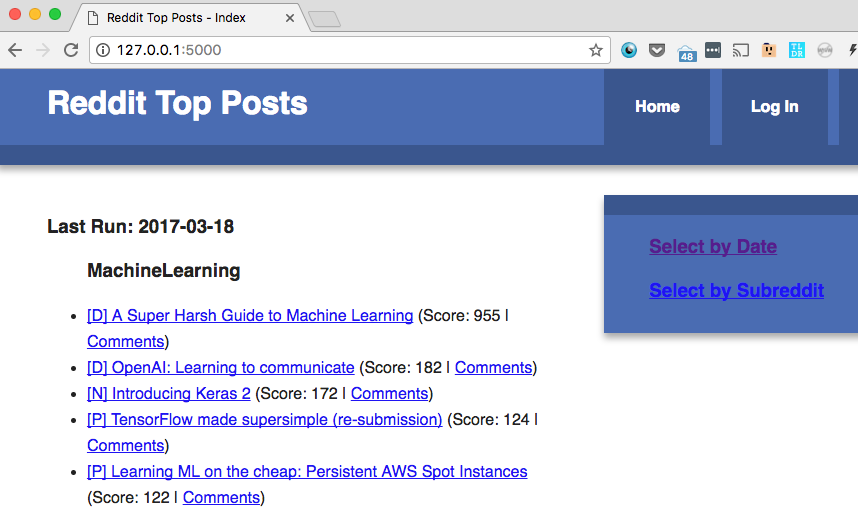
We'll open the page in a browser:

Looks good!
Notes
- In the CSS, I changed the color of the Responsive template from orange to blue as I will be using this template for a few work projects.
Conclusion
In this post, we looked at different ways of getting data out of MongoDB and into the hands of our user. We covered Python web frameworks, explored the Flask microframework, learned about the Model-View-Controller design pattern, and created our first Flask web application.
Next Steps
The next post in this series on Flask will delve into testing; specifically, unit testing in Flask using the unittest module from the Python Standard Library. Unit testing will allow us to create tests which can ensure our program functionality does not change as we implement additional features to this project.
Comments